Several years ago, I made soap out of deer tallow, and it worked very well. It was simple to do, but potentially dangerous! Here is an expert, Karla Moore, of Heart of Iowa Soapworks, to explain how to safely make soap during a survival situation. – Leon
by Karla Moore
Disclaimer: Soap making has the potential to be very dangerous. DO NOT attempt to use this method without following the safety protocols.
In a survival situation cleanliness really becomes a top priority. Without it, you risk a higher than normal chance of contracting disease or spreading infections. The best defense is to keep everything that you are in contact with as clean and germ-free as possible.
")
In a real survival scenario there won’t be any grocery stores to go buy soap or supplies. You’ll have to learn to make do with what you have on-hand. Learning to make soap is a very good skill to learn…before you actually need to use it!
The following formula is for a very simple basic soap. Just like in my grandmothers’ day it can serve multi purposes, everything from washing dishes to washing grimy little kids!
SAFETY PRECAUTIONS MUST BE FOLLOWED!
Always handle LYE (Sodium Hydroxide) wearing rubber gloves, eye protection and a face mask.
Equipment and supplies to have on hand: Lye (Sodium Hydroxide) also known as drain cleaner. Purchase DRY product that states on the package that it is 100 percent Sodium Hydroxide. Regular drain cleaner (Drano) that has flecks of color will not work, nor will the liquid type. Red Devil or Roobo are two brands that are available in hardware stores or some home improvement stores.
As long as the Lye is kept in an air tight, moisture tight container it has an almost indefinite shelf-life.
DO NOT USE ANYTHING ALUMINUM!
Lye reacts violently when it comes in contact with aluminum, bubbling up and releasing a toxic gas. It will eat through the pan and ruin a whole batch of soap. Stainless Steel or Plastic equipment is the safest to use.
Here’s what you need:
Rubber Gloves, Face Mask, Eye Protection Goggles or a full-face Mask.
Stainless steel stockpot or a heavy one-gallon plastic bucket
Plastic, wooden or stainless steel stirring spoons. Regular and slotted (do not use wooden spoons for food.)
Heavy plastic pitcher to be used to mix lye and water. DO NOT use this for food afterwards.
Mold to pour soap into: Plastic containers such as Gladware or Rubbermaid work very well. A wooden box lined with freezer paper (slick side towards soap) or cleaned out milk cartons or baby wipe containers work very well…plus they are free!
Digital Scale that is accurate to .1 oz. (1/10th)
Ingredients:
42 oz. Meat fat based Shortening (I use the store brand), Lard or Rendered Tallow 2.5 oz.
16 oz. coconut oil
8 oz. Lye
14 oz. Water
2.5 oz. Skin and Soap Safe Fragrance or 1.8 oz. Essential Oils of choice (optional)
Line your mold if needed. Have fragrance measured out and set aside if using. Place the Shortening & Coconut oil in a Stainless steel or heavy plastic container. Chop up the big chunks to make it easier to melt.
PUT ON YOUR SAFETY EQUIPMENT!
Make sure that all kids and critters are OUT OF THE ROOM when you are working with lye. Measure out the water in a heavy plastic pitcher. (I use a Sterilite one from the Dollar Store.) Carefully sprinkle the lye into the water.
NEVER do it the other way around and pour water onto the lye. You risk having it volcano out of the container….yes, I have had it happen to me! Stir thoroughly until totally dissolved. Do NOT breathe in the fumes! At this point the lye mixture is VERY HOT and will be at a temperature over 180ºF.
Carefully pour the hot Lye mix over the fats, trying not to splash. Mix until the fats are melted and well combined. Stir until the soap reaches “Trace”. At this point the oils will start to be “Saponified”, or in other words, the chemical reaction is making soap!
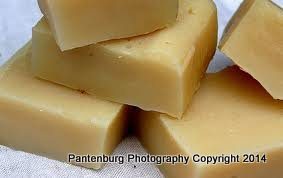
At Trace the mixture will have a consistency of a warm pudding right before you pour it. Add your Fragrance( if using) and thoroughly combine, scraping the sides of the pot with a rubber spatula making sure there isn’t any free lye or fragrance floating around. Pour into a prepared mold.
Cover with plastic wrap or a lid, then wrap in an old towel to keep in the heat. Let this set overnight undisturbed. Uncover and let cool. After 24 hours you may unmold the soap and cut it into bars (I wear thin rubber gloves.)
At this point the soap may still be caustic. An old stainless steel drywall knife or cheese cutter works to cut it. Stack the soap in rows on a covered surface, in a well- ventilated area to cure for three to four weeks.
For more good DIY homesteader info, check out – and please subscribe – to Karla’s Homesteader Arts.
Karla Moore
Karla Moore is a professional soaper, and owned and operated “Heart of Iowa” soapworks near Gilbert, Iowa for 15 years. Karla has very sensitive skin and is allergic to the detergents used in most commercial soaps. She started making soaps for her own personal use, and started her business in April, 2000. Her experimentation, and earlier training as a cosmetologist, subsequently lead to a special line of soaps designed for people with allergies or similar skin conditions.
Karla specializes in soaps for people with allergies and also teaches soapmaking classes for the Iowa State University Extension Service. She enjoys visiting with both beginner and experienced soapers.