Just about every survival manual shows how to build a snow cave. But the reality is that most people don’t have the skill, tools or time to effectively use this technique.
This book, “Snow Caves For Fun and Survival,” by Ernest Wilkinson, will help you learn to build your snow cave successfully.
by Leon Pantenburg
One of my favorite Boy Scout outings is Winter Skills Day, when we go out in the gorgeous Oregon back country to practice building emergency and survival shelters in deep snow. One of the more interesting lessons has come from building igloos and snow caves.

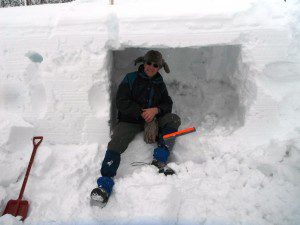
I was able to quickly excavate this snow cave, using a piece of plexiglass and a small shovel. There was plenty of room for another person to work at the same time.
All the Scouts want to build an igloo. It sounds super cool and the older Scouts who’ve done it for years will jump right into that task, IF conditions are good for it. The youngsters will help and folks have a good time. Most years, however, the snow isn’t right for the igloo and that idea goes bust. Some years we have no snow and some years it’s wet and heavy, or dry and too powdery.
The purpose of the Winter Skills day is to use what you have to build your shelter, so the kids learn quickly what works and what doesn’t. And since our troop scouts attend the event annually, it takes many years to build confidence in the techniques that work.
Sure, there have a been a few years when the iglooes work out and those are legend. (Seriously, the Star Wars-like complex for six with the poker playing suite was the best!) But most times that’s not the case.
So in my opinion, building an igloo is not an option for a survival technique. Have fun with it, but keep it recreational when you have the team and the skills and a backup sleeping plan. It requires a huge amount of time, specialized building techniques and the correct snow conditions. That’s too much risk to be dependable.
That brings me to Snow Caves.
Most folks think you just need to dig into the side of a hill and sleep in it. Well, sort of, but a lot more is skill required than that. There’s a drawing in the book, “Snow Caves For Fun and Survival,” that details some best practices for successful cave making, but there’s also discussion about the realities and downside of just burrowing into a snow drift to make a shelter.
Some enthusiasts encourage you to dig sideways into a drift, and then up. Don’t do that. You need a minimum of two to three cubic yards of snow to be dug out and removed out of a small entrance hole for the shelter to both fit an adult and stay warm. Several problems crop up immediately when using this model, thus the reason this technique is NOT recommended:
- The small entrance severely limits the digger’s ability to remove snow.
- Only one person can effectively work at a time.
- The cramped quarters limit what tools can be used, and the efficient use of them.
- The snow in a drift is usually hard packed and difficult to remove.
- You will probably get dangerously wet wallowing around in the hole while attempting to shovel out the loose snow.
To further test these so-called snow cave techniques, I asked my 17-year-old son, Dan, to make a snow cave by himself on an outing. A skilled outdoorsman, Dan has helped build many igloos and emergency shelters in deep snow, and knows exactly what to do. But even with the proper tools, and youthful enthusiasm and endurance, it still took over two hours to make a single-sized snow cave, using the above described method. (It’s important to carry a good pack snow shovel into the outdoors)
When the cave was completed, Dan was tired, wet and cold. Spending the night in that shelter, in his condition, would have been a rough experience.
“Snow Caves For Fun and Survival,” is a good resource to help you do it right! Author Ernest Wilkinson is a former Search and Rescue member, and an experienced Colorado mountain guide, specializing in snowshoe treks and winter camping. According to the book liner notes, this back country experience lead Wilkinson to develop his own shelter-making techniques that save time and energy and increase comfort and safety. I’ve learned a great deal from this concept and tested it out myself.
Wilkinson’s technique is simple: cut out blocks from the front of the drift to the width of the cave. Excavate. Then, use the removed snow blocks to create a front wall.

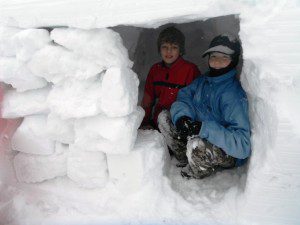
These scouts were well-protected from the weather in this snow cave.
I tried this technique at the Boy Scouts annual Winter Skills Day. Taking only some minimal tools, (a piece of Plexiglas, machete and small shovel) I started digging into the wall of snow next to the parking lot. Using the Plexiglas, I quickly outlined the width and height of the cave.
Within 15 minutes I was about three feet into the bank. (Another person working would have sped things up – I could have handed the snow blocks out more easily.)
Once the desired depth and width was achieved, it would have been simple to dig out a trench in the middle for a cold well, thereby creating two benches for sleeping.
But within half an hour, working alone, the cave was big enough for two people to take shelter from a storm. Blocking in the front to shelter the wind and cold was quick and easy. Maybe most importantly, I didn’t get wet or expend a tremendous amount of time and energy in the process.
Covering the front with a tarp was also an option. With my space blanket and tarp from my Ten Essentials kit, and a candle to heat the interior, it would have been possible to survive a night out in the deep snow. It could even be reasonably comfortable!
Like any survival technique, this should be tried and practiced before you consider a snow cave a viable survival shelter for you.
Check out “Snow Caves For Fun and Survival” and have a great time with your family and friends. And as important, be prepared to survive in an emergency snow environment.
Please click here to check out and subscribe to the SurvivalCommonSense.com YouTube channel.


Leave a Reply