Want to make a long-lasting wooden “candle” for outdoor emergency lighting, warmth and cooking?
All you need is a log and saw!
by Leon Pantenburg
It takes a lot of wood to build and maintain a bright, warm campfire. But what if there isn’t much wood available, you want to stay warm and also be able to see in the dark? One possibility might be to make a log candle.
")
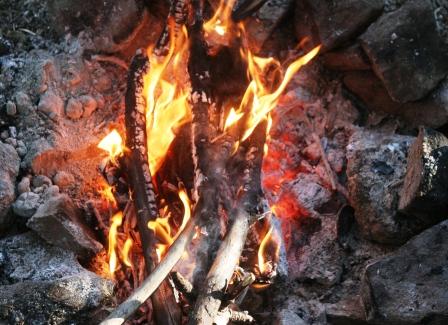
These three Scandinavian log candles will provide light, warmth and a cooking area for several hours.
I was camped along a popular lake in Central Oregon and noticed a man at a campsite working on a four-foot long log. He had already done some work with a chainsaw, cutting six pie-shaped cuts about 18 inches lengthwise into the end of the log.
“It’s a Swedish candle,” he commented, while poking pine pitch into the saw cuts. “I’m making it for a wedding present.”
The idea, he said, is to make a controllable fire that provides warmth and light. The base doesn’t heat up, so the fire won’t melt down through the snow and put itself out.
The log is prepared by cutting lengthways with a chainsaw, he said, for about 18 inches. Height can be whatever you want.
There was a chainsaw in our camp, along with unlimited firewood logs from blowdowns of Ponderosa and Lodgepole pines. It didn’t take me long at all to make a candle.
In camp, we had a Swiss ski instructor, and he was very familiar with the log-torch concept. The torches are very popular at winter events in the Scandinavian countries, he said, because they provide warmth and light. But he couldn’t narrow down the country of origin, so I’m calling it a “Scandinavian log candle.”
Here’s how to make one.

Once the cuts are made, the top is packed with pine pitch and lit. The melting pitch will spread the flames down the saw channels.
- Find a log about eight-to-12-inches in diameter.
- Bury one end about knee-deep in the sand or dirt, so the log is securely anchored and immovable. In deep snow, it would probably be best to stomp down the snow, and then dig a hole for the log.
- With a saw, cut lengthwise down from the top in pie-piece segments. It didn’t seem to matter exactly how long the segments were. The fire stops at the end of the cuts.
- The cuts are then loaded with pine pitch or other tinder or kindling and this is lit to ignite the log segments. Don’t pack the cuts too tightly, or the air flow will be blocked.
The first candle was such a hit that we made more all week. We used pine pitch to ignite the first candles. But once we depleted the campground’s pitch reserves, we were forced to use lamp oil brought in for the bamboo Tiki torches.
It didn’t seem to matter. Once the wood was ignited, the candles could burn from one to three hours. Fire longevity was directly related to the length of the cuts.

Saw channel length determines flame height and how long they last.
In a survival situation, this log candle technique could prove to be invaluable. In the dark aftermath of a disaster, light might be critical, especially if there was no electricity or artificial means of creating illumination.
In that scenario, a person with a chainsaw and access to a downed wooden telephone pole could quickly make a few of these candles for lighting. I didn’t try it, but there is no reason you couldn’t cook or boil water on top of the candles. And think about this – if the ground was saturated, or there was standing water, a log candle could burn without being affected by excessive moisture.
An added benefit is that the log candles are fun to make. Every night of the campout, the kids in the party would arrange a different pattern for the candles, and an adult would do the chainsaw work. Then, after dark when the torch were lighted, the kids hung out around them.
Cleanup was easy: In the morning, when the fire was out and the logs were cool, the stumps would be dug up and used later for campfire wood. We also picked up trash left behind by other campers. The beach and campsite were left cleaner than when we arrived.
Please click here to check out and subscribe to the SurvivalCommonSense.com YouTube channel – thanks!
Check out the video to see what the candles look like in use. We had to use some lamp oil to get them going, since all the pine pitch had been used up!

Leave a Reply